madbeanpedals presents: Jack Orman's "Mosfet Booster "
Oh, mosfet booster...will you ever cease to amaze me?
Back when I first started building pedals I had a hard time deciding what projects to take on. I couldn't read schematics, couldn't solder and for sure couldn't debug builds. That limited my choices quite a bit.
My third project was the Jack Orman Mosfet Booster of Doom (I added that last part). I was amazed that this thing actually worked the first time I plugged it in. More amazed at the sound coming out of it...especially when you slammed the gain pot all the way. It was like a tiny Jimi Hendrix had invaded my Vibrolux begging me to play double-stops. It was also loud as fuck.
Anyway, a few weeks ago I dusted this thing off to take a look at it again. Sure enough, I was horrified by what I found inside.

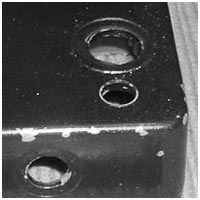
Oh, boy....this box is teh suck.
I also didn't know how to prep and paint boxes. This paint job (my second) featured newspaper stuck to the bottom from not using standoffs, nail polish to insulate the original metal DC jack (didn't work) and a 1/2" hole drilled for a 24mm pot.
I wasn't just inexperienced...I was totally retarded.
And the final insult.
This is absolutely terrible. I mean....look at it. I destroyed this beautifully etched PCB from General Guitar Gadgets. One of the traces has completely lifted, as well. That probably explains the enormous hum I was getting from this pedal.


Time to make things right.
First in order was to clean up that PCB. After several minutes of desoldering, sanding and polishing with steel wool I got something that was worth working on again.
Let's waste some sandpaper and electricity!
Next up was re-doing the crappy gold painted box. I gave up painting boxes a few years ago because the results are always inconsistent. It's just really hard to get a professional look out of spraypaint and clear coat...well, for me it is.
These days I just buy pre-painted boxes if I plan on something fancy. Usually, I just sand them and either etch or label what I want directly to the surface. The sanding process is time-consuming, but well worth it. I bought a $30 electric sander from Lowe's and can usually finish the job in 20 minutes.
BTW: I usually sand in this gradation: 100, 150, 240, 400, 800, 1000, 2000 grit. By the time you get to 2000 grit it looks like the fender of a '57 Chevy.
Okay, I lied...it doesn't look that good. But, dang it sure is purty!


My parts, let me show them to you.
The next part was fast....rewiring the components. I endedup replacing most of the original components which wasn't bad since the circuit has a low part count. I had to use some carbon film resistors since I lacked the values in metal. Also, I realized I was out of 5k pots halfway through the project. No worries, tho. I used a 24mm 10k. It works just as well. I could have used a resistor to knock down the pot to around 5k, but why bother?
If 5k is rockin' then 10k is slammin!!! Right??!!! Right>>>>>!!!!1111
Putting wires in boxes: how I spend all my free time.
Wiring your box can be time consuming depending on the detail you put into it. Sometimes I just slap circuits in, make the wires short and hope for the best. Other times I bend things around in the hopes to make it look cool in case someone else ever looks inside (they don't). Lately, I've gotten in the habit of bending and gluing things down. This is probably a waste of time so I will most likely keep doing it.
Anyway, here's the finished guts shot. Probably took me about 30 minutes.


The completed build, or "How I Spent Sunday Afternoon Not Paying Attention To My Wife".
This is my fourth Strong Bad build. I don't know why I am obsessed with putting images of Strong Bad characters on my boxes. They just seem to work. Also, it means a lot less time in Photoshop.
This stage is usually easy anyway. I just cut out a 2" square of wet slide decal stock for labeling. Then I applied four layers of clear coat and polished. Unfortunately, I didn't let the finish cure long enough before buffing, and my Dremel gunked up the side a bit (the side you don't see in this photo...clever, huh?)