News:

Forum may be experiencing issues.

Main Menu
Menu

Show posts

This section allows you to view all posts made by this member. Note that you can only see posts made in areas you currently have access to.

Show posts Menu

Topics - aion

#1
Open Discussion / New website!! aionfx.com
October 27, 2020, 02:20:26 PM
Been working on this for the better part of 3 months now, and finally got it launched this afternoon!


Still a few more things on the list to do in the coming weeks, but the vast majority of it is done at least. Looking forward to picking the soldering iron back up though - it's certainly been one of those heads-down projects.
#2
Just a few minutes ago. Smashed the record for most expensive guitar ever sold. Second place was the "Reach Out to Asia" tsunami relief Strat back in 2005 ($2.7 million).

https://www.christies.com/lotfinder/lot_details.aspx?intObjectID=6198189&lid=1
#3
At the beginning of the year, Paul Marossy (a legend at DIYSB) got in touch with me about helping out with a trace he had started close to ten years ago but never finished - the Bouteek Distorter Preamp. It's a super obscure amp-like pedal meant to emulate Marshall style preamp distortion tones. It was always marked as "limited edition" and only ever sold on one website. Based on the scant information about it online, I suspect that fewer than 1000 units were made, back in 2009-2010.

It was rumored that someone from Peavey was involved in the design process somehow, and the six-layer (!) PCB layout didn't bear the marks of some guy tinkering in his basement - but Bouteek never really went anywhere and they were completely gone by 2015.

Well, after some back and forth with Paul, I was able to finish up the trace and work out the problem areas he had gotten stuck on. And today, the Vortex Amp Distortion is released to the wild! I love preserving this stuff, so I was really excited that Paul got me involved and that I could be a part of introducing this pedal to the community.

Here's a demo of Paul playing it once we'd gotten the schematic finalized:
https://www.youtube.com/watch?v=-W4DUcpK3so

It's a pretty interesting circuit. Schematic is available in the documentation linked above, but basically: take two TS-style non-inverting feedback clipping stages with independent gain controls, then onto a Big Muff tone control and then a few additional opamp stages on the output to further shape the tone. Add in a 4PDT switch to change the sets of diodes in the first two stages and also change the lowpass & highpass filters on the tone control via CMOS switches. One side is "vintage" mode and one side is "rectifier" mode. (The Vortex splits these out into two DPDT switches for independent control.)

How's it sound? Pretty spectacular, I think. Despite being fairly common building blocks, the overall sound doesn't really fit into any of those boxes. Sort of a "sum of the parts" situation. I was really surprised at how refined it was when I played through it and I think people are going to love it.

Crazy story to go along with this. As I said, these are super rare. I found one that was listed on Reverb a couple of years ago but that's it. However, I noticed that particular listing was taken down and not actually sold, so I got in touch with the owner to see if he still had it. And not only did he still have it, but he only lived about ten minutes away from me! So after a long-shot Reverb message sent with no thought that it would amount to anything, I had one later that same day.

#4
Yikes. I and most of the other US-based PCB sellers around here rely on USPS's International Flats pretty heavily for international shipments, but they're changing it in a couple days so it's now only valid for documents and correspondence, not merchandise of any sort. Letters are now subject to the same rules as well, so there don't appear to be any sneaky alternatives.

https://about.usps.com/postal-bulletin/2017/pb22482/html/updt_006.htm

Did anyone else know about this?

I'm covered somewhat by Stamps.com/ShipStation - they have a new thing called the Global Advantage Program where you mail it to them and then they relabel it and send it overseas for only $2.50 extra (covering the cost of getting it to them, I think), and it's all done automatically so nothing really changes except the cost - apparently they have a special agreement with USPS allowing them to send packages as flats under the old rates and regulations. But it still stings.
#5
Not sure how many of you listen to gear industry podcasts, but I thought you guys might be interested in this one. Johnny from Alchemy Audio was this past week's guest on Amps & Axes and they spent the first 15-20 minutes of the conversation talking about the L5 Preamp pedal (my design that Johnny built last summer in a limited run of 50). One of the hosts is an amp builder so there was a fair bit of tech talk going on.

Here's the episode:
http://www.ampsandaxescast.com/episodes/2018/1/10/amps-axes-213-johnny-balmer
#6
I know several of you have built one of these, but in case you've had people ask you to build one for them and you don't want to, Alchemy Audio in Chicago will be building a limited run of 50 of them in the next month. Johnny sat down with Reverb.com and did a demo video which you can check out here:

https://www.youtube.com/watch?v=dp7VQmfxpdc

The preorder is available on Reverb.com or Alchemy Audio's website and he expects to be shipping late April.

I don't have any financial stake in these (other than that I supplied the PCBs) but am pretty thrilled to see it happening, and trying to help Johnny out by spreading the word!
#7
Open Discussion / Pedal Parts Plus move
June 14, 2016, 12:13:06 PM
I saw someone mention in another thread that Pedal Parts Plus was under new management. Their site only mentions moving to Hammond, LA but nothing about any organizational changes (and of course their Facebook page and forum haven't had any action in a couple of years). Anyone know the story? Is Connie still involved?
#8
Build Reports / Lab Series L5 preamp in a pedal
May 01, 2016, 06:03:29 PM


This is the preamp section of a Lab Series L5 amp in pedal form. I've been chasing this sucker for years, having owned one of the amps since 2008 and wanting to do some sort of clone or adaptation long before I knew a thing about electronics. Finally got inspired this past fall to tackle it, and six months later, this is how it turned out. It feels good to have it done! :)

The last pic is the best I have for a gut shot - right before I did the wiring. I'll try to get a finalized wiring photo up in the next couple of days.

PCBs available here ($20 each for the next 2 weeks, use coupon "beanplate" - normally $24). Warning - not for the faint of heart... 12 pots, 4 switches, 80 resistors, 50 caps and 12 ICs!
#9
So, I decided to tackle the Dimension C (!) and am about halfway through the design process for a project that I will release to the community in a couple months. It's going to be in a 125-B and no SMD. It's been a fun challenge and I've got a solid plan to make it all fit..

Now I'm getting to the point where I have to decide which bypass scheme to use. I was originally just going to use the Boss bypass—the DC-2 uses op-amps for the buffers, so as long as you use good-quality op-amps, the bypass should sound great. However, I just found out that the original Boss bypass doesn't work well with the mechanical momentary switches I was planning on designing around - it's made for a tactile switch that has much less bounce, and the circuit can be unreliable when using something other than a tactile. So that's a no-go.

This pedal is a mono->stereo splitter, so traditional true bypass isn't in the cards. It's got to at least pass through the first op-amp buffer stage to cleanly split the signal. I've seen others do senseless things in the name of true bypass (IIRC the Fromel Seraph would actually cut out the 2nd channel when in bypass mode... what?) and I want to make sure this is done right. Just looking for some opinions and feedback on what is the "rightest" :)

Original schematic here. The two circuit options, as I see it:

1) Preserve the original bypass path, meaning it goes through the input buffer, then pre-emphasis, de-emphasis, and out. Requires the equivalent of three SPST switches, plus LED.

2) Hard-wire the circuit "on" (omit & jumper Q1, Q11, Q12). Split the signal immediately after the input buffer. One pole of the switch grounds the circuit input from that point, and two poles switch the outputs, each going through an output cap. Still requires the equivalent of three switch poles not including LED, but this time they have to be double-throw.

Then there's also the actual technology of the bypass:

1) Mictester's latching relay, using a latching SPST switch and using two DPDT relays in parallel. One of the four relay switches will be unused. The relays are $3 each, but the other parts are pennies.

2) Optical bypass (H11F1/Optotron method), but with a 3PDT stomp switch instead of the usual DPDT. The one downside here is that the post-buffer input would not be grounded in bypass, just blocked by the optoFET, but that's probably fine.

3) 4PDT switch. (I really, really, really don't want to do this because of the inconvenience of sourcing them and the potential for hardware failure, but it's an option.)

I think either circuit scheme will work with any of the three bypass methods, so any combination of the above is an option. Whichever method I decide on will have to be built into the circuit and will be pretty much required, so that's why I'm trying to get some feedback before going full steam ahead on one specific method. What do you guys think? If you were building it, what would be your preference and why?
#10
Build Reports / 2011 Current Lover finished... finally!
February 13, 2016, 01:30:49 PM


Does this qualify as vintage now? :)

I originally purchased the board in 2011 or 2012, and populated pretty much right away, but then the hold-up was the enclosure. I had to design it first, so I traced the Electric Mistress logo in vector. Then Pedal Parts Plus temporarily stopped doing one-off printing jobs so my next option was to etch it - but for some reason my toner transfers weren't sticking to the particular alloy of the 125Bs I was using, or something. I don't know. What a pain. Then I got fed up with it and left it in a box for a couple years.

PPP started doing one-offs again, so I ordered one on their chrome powdercoat (which is really nice, by the way - a good alternative to polished aluminum), and was finally able to finish it up. It fired up the first time, which is awesome considering that I soldered it almost four years ago!

One word of caution, the UV printing over the chrome powdercoat is not super durable. I scratched some off when I was tightening the nuts. Fortunately it's mostly covered up, and it'll be easy to touch up the visible parts, but still, I was a bit disappointed. But I suppose that it'll just make it look road-worn vintage faster than normal :)
#11
I've been getting a lot of requests for a noise gate PCB. I don't want to do the MXR Noise Gate because it's mostly garbage. The PAiA Gator is woefully underdocumented and was not designed for guitar in the first place, plus it crosses the boundaries into attack-delay or Slow Gear territory.

The Decimator has become a pretty common project and has the distinction of being one of the more well-regarded noise gates out there right now. And the ability to sense the dry guitar signal but gate it later on (G-String version) is killer.

Only trouble is the patent. I don't see how they could have been granted a patent on an all-analog circuit with a few op-amps and a VCA, but I guess that's besides the point - knowing that they did, I'm sure it would be extremely easy to tweak the circuit so it no longer violates the patent.

I had to trace the DIY history of the Decimator across a few forums - it was started on DIYSB, but then deleted on fear of the patent infringement stuff. The discussion moved over to FSB where some of it was rehashed, some really interesting info was posted about optimizing the VCA functionality, but then it stopped cold a couple of years ago. There were some references to a cleaned-up version of the Decimator that were in the original DIYSB thread, but those are all long-gone and I couldn't find out whether it was a patent-free version or if it was just an optimization of the circuit with the patented stuff intact.

Did anyone ever come up with a "safe" version of the Decimator? I am aware of the Galego PCB which has made the rounds, but that's a part-for-part clone so it wouldn't work for me.
#12
Open Discussion / I love my job.
November 12, 2014, 10:57:22 AM
Day job, that is. I love designing PCBs and building pedals and all... but this is what I got to watch happen on Monday:
http://www.desmoinesregister.com/videos/entertainment/2014/11/10/18833559/

We flew out a YouTube domino artist from Boston to build a city-scape of downtown Denver out of dominoes, then we knocked it down. It's for a client of ours in Denver, a law firm who's celebrating their 30 year anniversary, so it's kind of a tribute to the city with a lot of their well-known buildings. The video itself will be played mostly in reverse when we're done with it, so it shows the city being built instead of destroyed (which would probably be bad for PR!).

This girl is incredibly talented - she's 16, but she's done domino videos for Honda, the TMNT movie, a couple music videos, and more. Check out her YouTube channel and watch one of the full rallies, like Rally 27. It was tons of fun to watch her working. She set up for 12 hours on Sunday and another six hours on Monday before we knocked it over. It was pretty nervewracking setting it off - you only get one chance for this type of thing, and if anything goes wrong, you have to deal with it. But everything worked, and many heart attacks were successfully averted!

I didn't make it into that news video at all (well, maybe just my shoe?) and can't say I had much of a part in building the spectacle itself, but someone had to clean up all the dominoes afterward! ;) We'll be finished with the video itself in about two weeks and I'll be sure to post back when it's ready. It's going to be super cool.
#13
Imagine Dragons played on last night's episode of SNL. Their guitarist uses one of my compressors. I've been freeze framing last night's show for the last half hour trying to get a better look. It's all over the place (the illuminated knobs make it hard to miss) but here's a good top view:


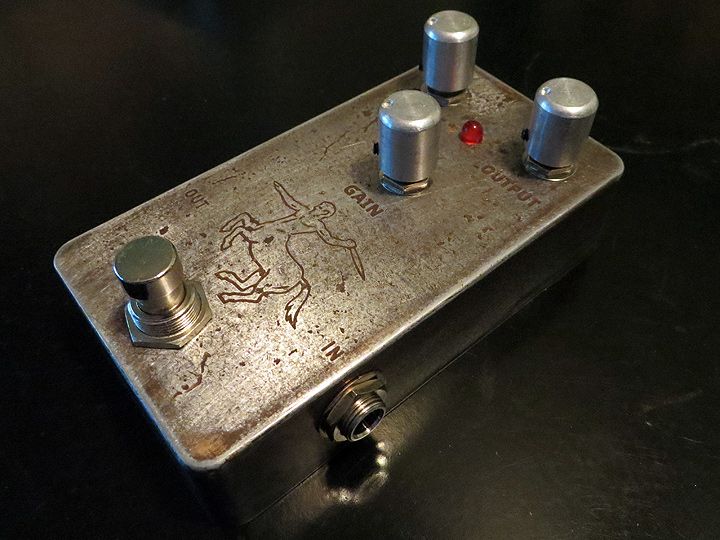
Kind of freaking out a little bit right now. He had a second pedal of mine on his board, too, a Centaur like this one, but the NBC logo covered it up in all the shots so that's no fun.

The guitar is a custom one by Bilt Guitars here in Des Moines. I think Wayne has five of them now.
#14
I'm trying to work out a cost-effective system to send PCBs internationally. If I send them in a bubble mailer, it automatically requires a customs form and costs me between $6.50 and $9.50 even if it's just one board, so that's not going to work.

I tried using flats like Bean talked about earlier this year, but even though I printed out the requirements from the USPS website and brought them with me, the postal clerk insisted that there could be nothing rigid inside the flat even if it passed the bend test. I think he's mistaken, but it's not wise to try to tell a professional that you know their job better than they do. So that's not going to work.

So I started sending them as letters in normal envelopes stapled to thin cardboard to keep them from moving around. They pass the thickness test (less than 1/4") and I've been able to send about ten of them so far without any trouble. No customs form, and it costs me between $2 and $3. I can send up to six PCBs in one envelope. They usually arrive in about a week, sometimes less. Pretty awesome.

EXCEPT, a different clerk at the post office yesterday insisted that if there's anything but a letter inside, it needs a customs form and they'll have to run it through as a package. So now I have a situation where, depending on who is behind the counter, it's going to cost me either $2 or $7+. Not a risk I can take.

I know a lot of you have shipped PCBs internationally as letters, so my question is this - do you think I would be able to just buy stamps (the big $2 stamps) and mail the envelopes myself without going to a post office? I would follow the pricing table on the USPS website, adding the 20-cent "non-machinable" surcharge since it's an irregular size, and of course erring on the side of adding too much postage instead of too little.

I'm tempted to just go for it - the worst that can happen is it gets sent back to me within a few days and I can try again a different way. But I thought I'd see if anyone else has any experience mailing things like this without going to the post office and could offer any advice.
#15
Build Reports / Etched Centaur build
September 26, 2013, 04:58:51 AM
A Centaur I built using the Refractor PCB... the distressing is all part of the etch, and then I went over it with Rub-N-Buff to get the rust and gold tones.