News:

Forum may be experiencing issues.

Main Menu
Menu

Show posts

This section allows you to view all posts made by this member. Note that you can only see posts made in areas you currently have access to.

Show posts Menu

Messages - Willybomb

#1021
Thanks guys, I'm going to check all those out.

Here's the funny thing.  I went and plugged the 2nd coppachino pcb in, and it worked in that it seemed to have volume, and some low level farty distortion.  As I was using an BC549C (and have plenty of those, or did..) , I thought I would switch it around and see if that made a difference.  Annnnd, no.. didn't work at all.  Swapped a new one in around the proper way (reverse to the silkscreen) and was back at the low volume no dirt result.

I have one more Coppachino board to try.  He tells me it's verified.  I'm sure it is, I should try and get hold of the proper 2n5008 I guess.  I have a 2n2222 kicking around.

No proper troubleshooting really beyond "that's all in the right spot and there's no solder bridges".

Laughing at the EM-drive. Five components, 2 pots.  Pretty certain I've got all the parts for it here.
#1022
Open Discussion / I need a drive recommendation please
February 26, 2016, 11:15:40 AM
Gudday all.  I'm looking for a chimey low-medium gain drive in the vein of the English Gent to pair up with a high gainer.

Why not just make an English Gent you say?  Well... I have.  3 times, and none of my builds have worked.  Two I've built from PIF'd PCBs from Coppanchino, and one I built from I\/Iark's vero layout.  The PCBs had an extremely low volume with no dirt in both cases, and the vero just doesn't work.  I've decided that this circuit and I are just not meant to be.

So, any suggestions on a similar thing with minimal parts and controls?
#1023
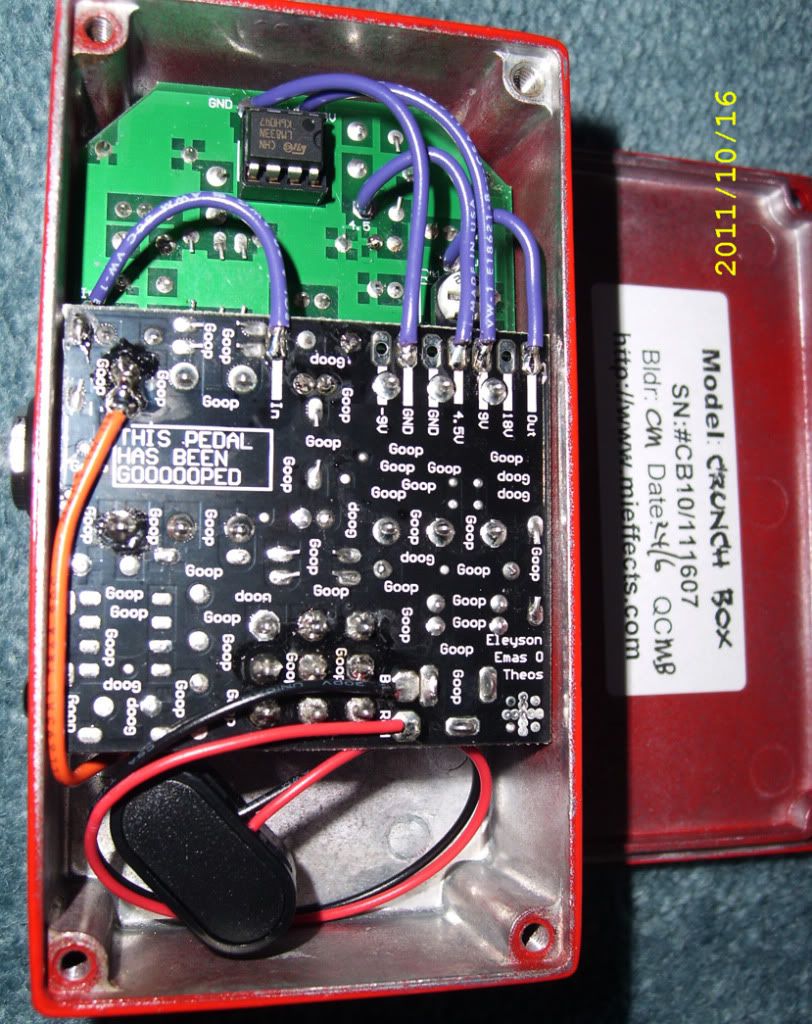
You won't get far with a new one.  I believe Madbean used to do a version of it until the guys at MI had a chat with him. I'm pretty certain I've seen a pic or post somewhere explaining that they started gooping due to other manufacturers using their design.  I don't think they took issue with the DIY crowd from the way I read it, but from other companies using the DIY resources to clone..

#1024
Build Reports / Harley's Hammer - Afterlife compressor
February 18, 2016, 03:35:21 PM
Gudday all, this is about my 9th attempt at posting this build.  I blame my dodgey internet.

Anyway, it's a Afterlife.  I hate testing compressors because I never know if they're working.  In this case turning the Sustain knob clockwise reduces the volume, and turning the Volume knob clockwise brings it back up again.

This distorts a bit with my Tonezone pickup at the bridge, but not with the 59 at the neck.  Can I put a resistor across the circuit input to ground to reduce the level going in?  If so, what value?

This is the usual black etching primer, with a coat of white undercoat on the top as backing for the generic inkjet sticker label that gets a bit transparent when the clear goes on.  Again, in this case it's an automotive lacquer that dries to the touch very quickly, and doesn't seem to yellow at all.


#1025
I'm thinking I'm going to try and box my Deadringer V1 etch into a 125b. Portrait. Not sure if this is going to work or not.  A BB might be a smarter idea.

I'm also going to deliver the Hyperactive Hyperdrive and Harley's Hammer.
#1026
Build Reports / Re: First Builds - Post yours here
February 16, 2016, 07:17:14 AM
Life got a lot easier when I decided not to bother with batteries..
#1027
Build Reports / Re: Multibuild: "Dragster Drive"
February 16, 2016, 02:02:44 AM
That's awesome. Love the artwork, love the font, love the concept.

How did you do the label?  I wish I could get mine on so straight - once the sticker touches, you either commit, commit and rip it off (usually followed by sanding), or rip it off (sometimes followed by sanding).
#1028
Thanks. I had to go 5->pin3, 6->pin2, 7->pin1 on the volume to get the clockwise volume increase.

On the sus control I went 1->pin1, 2->pin2, and connected pin2-->pin3.
#1029
Gudday all, just populated an Afterlife, no substitutions in the build.  It's acting pretty oddly though and if someone can help me out I'd appreciate it.

The sustain knob crackles when turned, and;
The volume knob is pretty quiet till until it's nearly fully clockwise, then there's a couple of hours of pretty loud, but the last half hour or so goes back to silence at the full clockwise turn of the knob.

I'm not using the breakoff knob board, but you'll see that in the pics.  I read the schematic and the layout and wired the pots as I understood it.  I recently did an Egghead and did the same, and that worked.

If you have any ideas, please let me know.

Thanks,
Willy.

#1030
Open Discussion / A question from Dad
February 12, 2016, 10:57:56 AM
I was sorting out my three pedalboards for a trip away (I was going to take the big board with some favorite builds to a mates), and when Dad saw the pile, he asked:

"How many pedals do you need son?"
"All of them Dad, all of them."
#1031
Build Reports / Re: First Builds - Post yours here
February 12, 2016, 10:35:37 AM
I posted these in my thread about their cleanup, but, anyway.. I built these about the same time.


#1032
Trying out some Tayda enclosures at the moment, been using Pedalpartsaustralia.com for the most part.

When I want some part quickly I use Chromosphere's diyguitarpedals.com.au . He also stocks lots of the rarer stuff, plus I like his wire.  Usually two days and I've got it.
#1033
QuoteNice! Does it run off a Mr Fusion?

Nope, it'll run off the Flux Capacitor that'll be in front of it in the signal chain.
http://www.madbeanpedals.com/forum/index.php?topic=21543.0

QuoteI take it She Who Must Be Obeyed caught wind?

More that she didn't want their 5 year old son to start thinking of women as objects which is probably fair enough.  The first version was just headshots of the brunette, redhead, and blonde, but the final version was from the chin down with labels and switches placed in strategic places.  "Scantily clad" was an exaggerated description of the presence of clothes...

And, now with knobs...
#1034
So what do you do when you finish a pedal at 3.45am Eastern Standard Time?

You gosh darnit get on the Madbean forum and show it off before you tighten everything and put the knobs on.  This is my best build ever.   I think.  Possibly.  More than likely.  It's pretty early/late here.  I'm certainly happy with how neat it is.

Here we have a multi for a friend of mine who picked these out after we went through my other builds and tried those and a stack of unboxed vero. 

I said "Which one do you like?"
He replied, "Can I have that, that, and that in one box? Plus a boost and a compressor?"
Yeah, ok.

So, this was going to be called "Dirty Box", then it changed to "Dirty Mind", and featured a trio of Scantily Clad Young Eastern European Ladies Of Dubious Career Choices as the artwork.  There was a policy shift on the homefront and we were going to go with the robots from Pacific Rim, but when I decided to go with the board mounted pots on the Kingslayer and use that layout for the other two effects I found the Delorian.  He's a BTTF fan too, so this is good.

Not the best 3pdt pcbs for this application as they lack 9v/ground through points, so that's why you see the ground getting daisy chained from the top left corner hanging off resistor leg cutoffs.  I really wanted to keep this neat, and I spent the day deciding how I was going to do the ground, and moreso the 9v runs.  I'll use different ones for my next multi.

Label is a cheap adhesive inkjet/laser printer paper.  Unfortunately, the clearcoat caused it to become somewhat transparent as it soaked in, killing the colour brightness and showing the black underneath and any flaws.  I tried spraying the label before application, but when that didn't work I sanded the box back to bare, sprayed the etching primer, masked it off and gave the top a coat of white enamel undercoat to give a white backing for the label.

I used a 2pack rattlecan ($$$) originally as I ran out of the 1k rattlecan I normally use and couldn't source it here.  It wouldn't/didn't seem to cure properly and that gave me cause to sand back too.  I used an enamel clear on another project but I was unhappy with how it yellowed (and yes, I sanded that back, eventually doing the white top on that project). So, I found a rattle can of clear lacquer I had lying around and used that.  Very, very happy.  Dries to touch dry in what seems to be seconds, but takes a while to harden properly.  Doesn't yellow at all, I'll keep using this stuff if I can keep finding it - even my favorite 1k yellowed a touch.

Would have been happier if I could have found a place that sold the waterproof laser adhesive paper as this stuff takes a few coats to get to a decent smooth thickness.

Anyway, behold, Hyperactive Hyperdrive.  Madbean Kingslayer, Egghead, and single channel Boneyard Haberdasher etch.
#1035
Thanks guys. I was in the lucky position of finding out about this before I'd boxed anything.

I ended up taping the enclosure.  I pulled out the drill press and did a pilot hole, and then used the step drill to get the width I needed, clearing the debris after every step.  The tape residue was the worst thing, plus a small thumbprint I left in the top from too much pressure holding everything (I'd caught that early though, so not much damage).

A quick cut with the wet and dry cleared up the tape.  This lacquer is soft enough that I was able to rub most of the print out, but I cut the rest of the top anyway and gave the whole thing another coat.  The switch hole is pretty much where it would have been if I hadn't missed it in the first place.

After drilling with switch on to check placement against back wall, and the two enclosures I'm working on.

Thanks again everyone.