News:

Forum may be experiencing issues.

Main Menu
Menu

Show posts

This section allows you to view all posts made by this member. Note that you can only see posts made in areas you currently have access to.

Show posts Menu

Messages - Fastocker

#16
Open Discussion / Re: Pulsar Decal Pro Questions
October 30, 2012, 04:59:42 PM
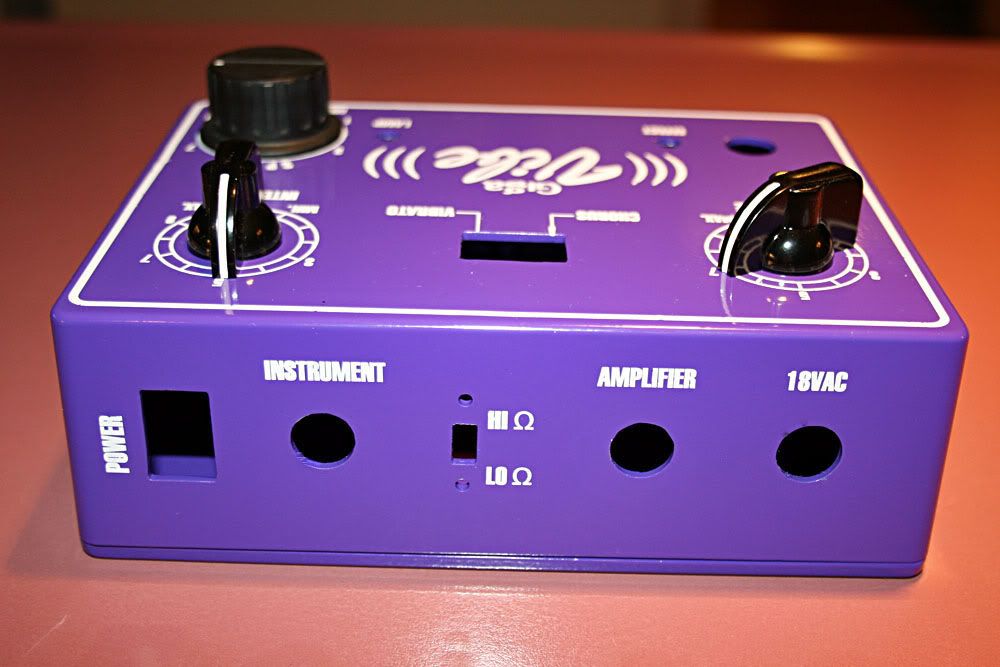
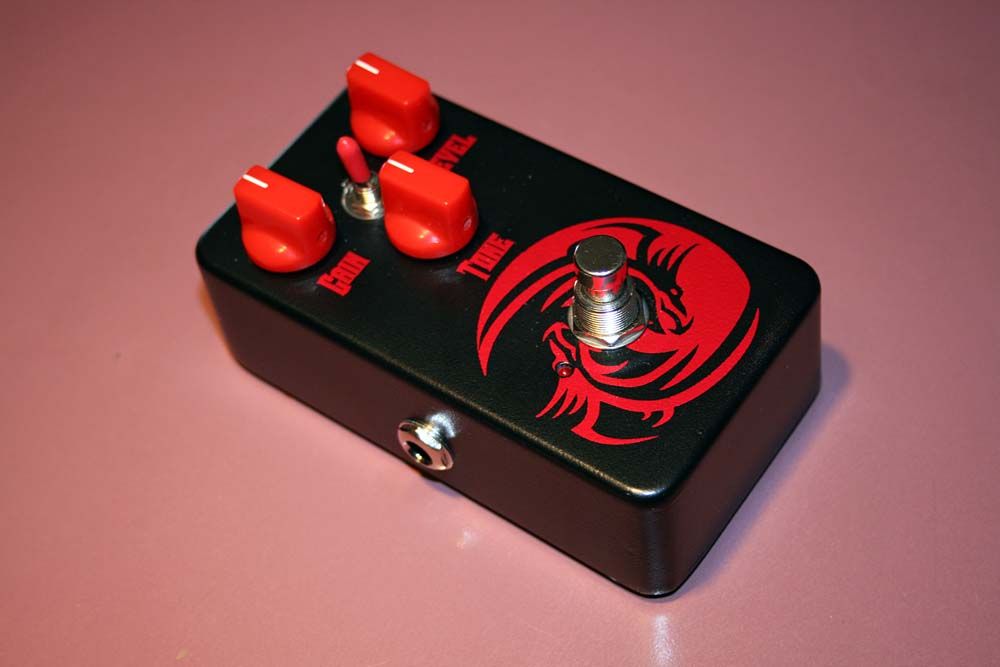
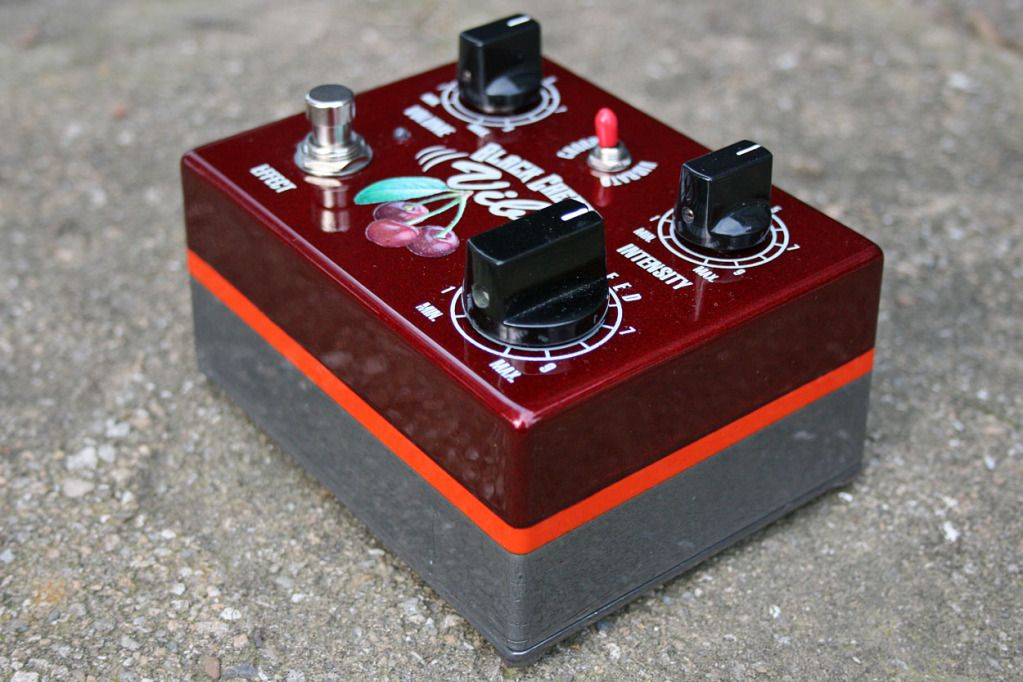
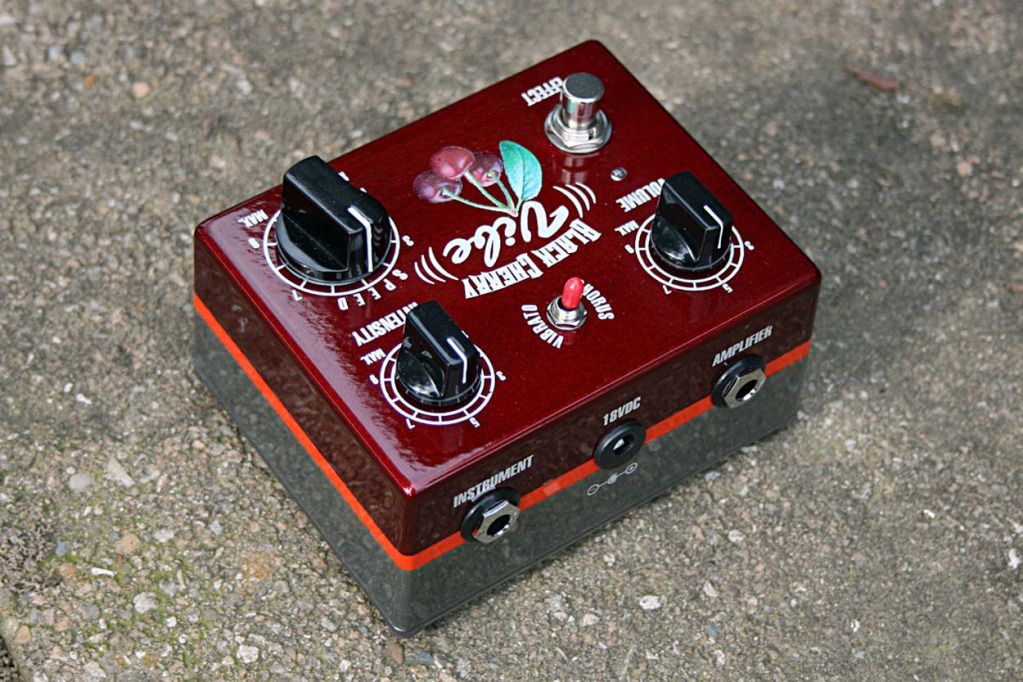
Yep, a color laser printer does work . . . I should have stated that more clearly.  I actually use a color laser myself (Samsung) -- I set the print quality to high and there are also some settings in the print settings pop-up window that prompt me to make all text black, enhance black print, etc. (I can't remember the exact settings). I check all of those print enhancements to do the darkest, most vivid black printing.

You can also do full multi-color graphics with Pulsar -- my Samsung laser doesn't exactly print bright, vivid colors so the results are OK but not outstanding.  There are a few extra steps with multi-color graphics but I've done a few.  Inkjet printers do nicer colors on decal paper but, of course, you can't apply those to dark colors.

I'm trying to develop a technique for doing two (or even three) different color foils on one box.  Would be cool to do white letters with a black shadow . . . or gold letters with a white outline or something.  If you guys have any tricks please post them.  Also -- if you come up with a new and helpful technique, email your find to Frank at Pulsar and he'll give you some free supplies.
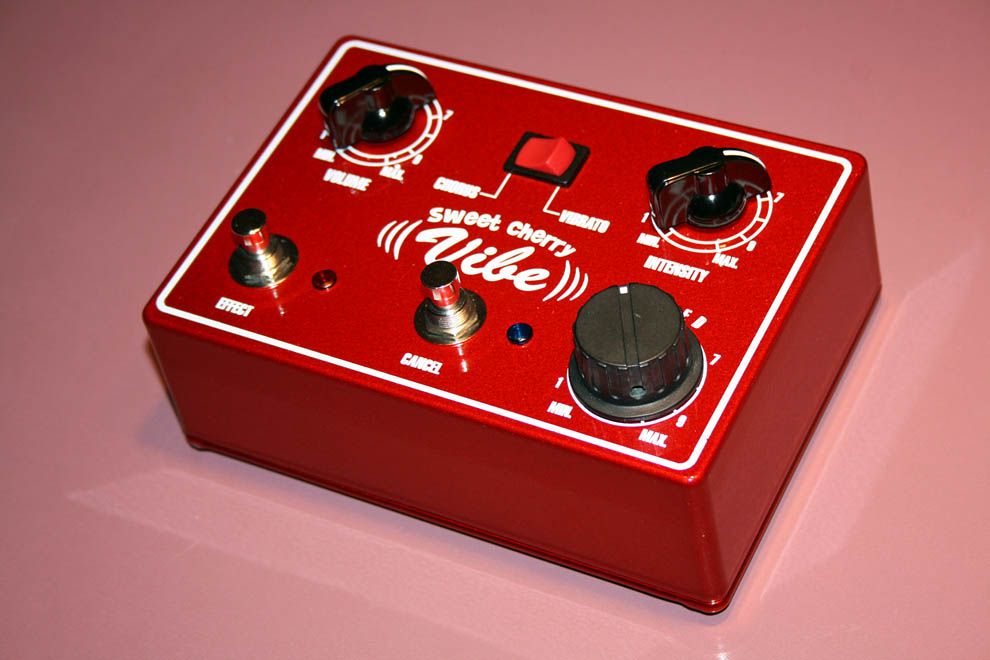
#17
Open Discussion / Re: Pulsar Decal Pro Questions
October 30, 2012, 03:12:57 PM
Here's another trick that helps with larger graphics -- I'll try to explain this as best I can . . .

Get some clear acetate paper . . . some decently thick stuff like people use to make clear report covers or overheads or whatever.  Something that is thicker or sturdier than normal paper but you can still see through.  Then cut out a square hole in the clear sheet that's a little larger than the graphic -- use this as a frame.

Then, once the graphic is out of the water and dry, carefully tape the graphic over the frame (color side up, black side down) so that anything that gets transferred is in the opening of the frame.  This makes the transfer nice and sturdy and it gives you something to grab as you're lowering the graphic onto the box.  Then just spray the adhesive from underneath and apply it to the box.

I messed a few things up when I first started using the Pulsar system -- there's definitely a learning curve.  But it's not super difficult and you'll really be impressed by the results when you get the technique down.
#18
Open Discussion / Re: Pulsar Decal Pro Questions
October 30, 2012, 03:00:01 PM
I didn't realize Mouser carried the Pulsar stuff . . . . good to know.

That graphic may be a bit challenging for your first attempt -- you may want to break that one up.  Is that a 1590-DD sized box?  If so, that's a fairly large area.  With the Pulsar system, you'll have to create a 1/2-inch thick border around the entire graphic . . . so you'll barely fit one graphic onto a sheet of transfer paper.  Also remember, you need a B/W laser printer to use the system.

Are you planning on white graphics for that one?  Again, I've found white to be a bit tougher to work with . . . it seems to want to break up a bit easier when dipped in the water.  Satin silver looks 'almost' like white and seems to hold together much better when you're separating the graphic from the transfer paper (in the water).

Jimmybjj (and Keefe) posted good points as I was typing this -- there's no sliding the graphic around to position it like with waterslide decals . . . once it's down, it's down.  I usually put markers in pot holes or switch holes or create some other visual reference to help align the graphic on larger pedals.  The red vibe I did in the other post was one transfer and it was challenging to get right.  Smaller boxes (125B or whatever) are much easier.

So . . . for a first attempt, I'd probably break that one up into sections as the others have said.
#19
Open Discussion / Re: Pulsar Decal Pro Questions
October 30, 2012, 11:58:50 AM
Quote from: irmcdermott on October 30, 2012, 02:53:19 AM
Awesome, Thanks for all of that info Fastocker.

When you do clear over it, what temperature do you cure at? Do you lower it at all when working with this stuff?

Depends on the clear you're using.  I've been using NIC's Clear Vision (385-400°F).  PBTP glass clear cures at 340°F and there's also the diamond acrylic clear which cures at 325°F.  I normally cure at the recommended temps but I make sure I don't leave them in the oven for too long.

Again, I don't think it's absolutely necessary to clear over the graphics once they're dry unless you're really harsh on pedals.  I've done little test panels with the Pulsar decals and could NOT scrape them off with my fingernails after they had set properly.  But if you really want the durability of a clearcoat, maybe try the glass clear -- the graphics should certainly hold up at 340°F.

BTW, I found out you can sand and buff clear powdercoat.  I did a pedal early on with the Pulsar stuff and clearcoated it.  It came out a bit orange peeled in one corner so I shot a second coat of clear . . . and then a third.  I wasn't happy with the results so rather than strip the whole thing, I started block sanding the box with 800 grit paper.  That smoothed everything out nicely, then went to 1200 grit, then 1500 grit and then finished up with 2000 grit.  Hit it with my little orbital buffer and some compound and . . . voila!  It looks like a glass sheet now . . . gorgeous but waaaay too much work to do on a regular basis.
#20
Open Discussion / Re: Pulsar Decal Pro Questions
October 29, 2012, 04:54:42 AM
Some things I'll add to what others have said regarding the Pulsar stuff:

1.  Do the gear swap if you get the GBC laminator (slower pass-thru, more heat).

2.  Get the laminator fully up to temperature . . . usually takes 15-20 minutes.

3.  I've clear powdercoated over some of the Pulsar decals and it works fine . . . as long as you're not using red powder for your basecoat.  Red seems to want to bleed, other colors seem fine.

4.  I haven't clearcoated over the last three or four boxes I've done with the Pulsar stuff and I haven't gotten a single chip yet -- I've dropped a guitar cord on my red vibe (see the other thread) more than once and no chips or marks yet.  The Pulsar decals seem pretty stout after they dry for a day or two.  Right now I don't have any plans to clear coat over any of the Pulsar stuff in the future.

5.  As Keefe mentioned, don't be in a hurry to remove any residual adhesive with alcohol.  Give the graphic several hours (or a day) to dry then you can gently wipe off any residue with a paper towel wetted with rubbing alcohol.

6.  White is the toughest color for me . . . the other colors are a breeze.  Buy extra white foil when you order.

7.  Satin silver looks almost like white . . . and is much easier to use in my experience.

8.  Once applied, let the decal dry for a day before you assemble the pedal.

9.  I've talked to Frank Miller at Pulsar and he was very helpful in getting my system sorted out.  He even sent me some free foil and paper after I screwed some stuff up in the very beginning.

10.  Be prepared for a little learning curve . . . and there is some technique involved.  Again, Frank Miller helped me with a few minor details that really helped.  It was a bit frustrating for me at first but I got the hang of it soon, especially after Frank told me about the gear swap mod to the laminator.

Wait until you do your first white or silver graphics on a dark color . . . you'll stand back when you're finished and just go "WOW - I DID THAT", lol.

#21
Build Reports / Re: Vibe-Mania! (Incl. Warhead) >>
September 26, 2012, 02:46:41 AM
Quote from: eldanko on September 26, 2012, 02:25:25 AM
Quote from: Fastocker on September 25, 2012, 08:41:01 PM
Quote from: eldanko on September 25, 2012, 03:41:36 PM
Which version of the Forum Vibe did you end up going with?  I have been toying with the idea of tackling one of those...

This is the latest version V3 of the Forum-Vibe.  Keefe (Haberdasher) etched the regulator board for me . . . it's tucked up on one side of the enclosure using adhesive stand offs.

Right on, right on.  Did you do the Mods, Vintage, or Red House version?

I built the Mods version.

Now I'm itching to maybe try to build a replica of an original after seeing Sinner's files here:

http://www.turretboard.org/?p=2213

If I can figure out where to get a transformer and then find someone to etch a nice board on old brown phenolic material, well then . . . hmmm . . . might be fun . . .
#22
Build Reports / Re: Vibe-Mania! (Incl. Warhead) >>
September 25, 2012, 08:41:01 PM
Quote from: eldanko on September 25, 2012, 03:41:36 PM
Which version of the Forum Vibe did you end up going with?  I have been toying with the idea of tackling one of those...

This is the latest version V3 of the Forum-Vibe.  Keefe (Haberdasher) etched the regulator board for me . . . it's tucked up on one side of the enclosure using adhesive stand offs.
#23
Build Reports / Re: Vibe-Mania! (Incl. Warhead) >>
September 25, 2012, 02:40:23 AM
Quote from: fish22 on September 24, 2012, 01:50:34 AM
:o whoa!
absolutely killer. I love all 3!
I watched the Pulsar video from that link and I don't really understand what the magic is.
It looks like waterslide but I guess it isn't since it can do white graphics.... ???

The decals are dry transfer film -- I'd do a tutorial but the Pulsar site has pretty good info already there.  Two things you need are a laser printer and a laminator . . . a decent paper cutter also helps tremendously.

The final decal is ultra thin -- much thinner than a waterslide decal and you can barely feel the graphics on these.  The film is opaque so you can put white or gold or silver (or any color) on dark backgrounds and the colors really pop.  Plus they're proving to be very durable once the glue dries for a day or two . . . no chips on any of my pedals yet with no clear coat on top.

Here's a Joyo Ultimate Drive I redid (after doing the infamous Alpha mods) . . . the Red Dragon OD uses Pulsar red over satin black:


#24
Build Reports / Re: Vibe-Mania! (Incl. Warhead) >>
September 25, 2012, 02:28:26 AM
Hey guys, nothing too trick going on inside of these --- one thing I like to do is to mount the boards to the bottom cover of the enclosure using screws and stand ups.  This gives more room to put the pots and switches wherever I like and allows me to lift the top off and tune the trimmers easily while playing.  I countersink the screw holes on the bottom so the screw heads are flush with the bottom.

But . . . by doing it that way you have to leave a lot of wire to the pots so you can get the box out of the way while you dial in the trimmers.  As such, there's a bit of a rat's nest of wires in these things and not as neat as I usually like.  Here's the board from the Sweet Cherry Vibe -- one trimmer is for the offset, one was simply to fine tune the brightness of the flashing LED . . . and the third one wasn't used as it was for an experiment that didn't really pan out.  I made the light box out of copper sheet and soldered the corners shut.


Gut shot of the Black Cherry Vibe (Forum-Vibe board) -- light cover is a 3/4" copper cap:


Gut shot of the Warhead Vibe (board by Keefe):


#25
Build Reports / Re: Vibe-Mania! (Incl. Warhead) >>
September 23, 2012, 01:00:19 AM
Quote from: jimmybjj on September 23, 2012, 12:40:26 AM
Fantastic as usual! Are us using the pulsar for the graphics? If so did you clear over the white?

Hey Jim -- yeah, I used the Pulsar kit for all the graphics.  I didn't clear over any of the graphics in the photos -- I found out that the Pulsar stuff is pretty sturdy and durable once you let the adhesive dry for a few days.

Also found out that you really can't clear coat over red with white graphics . . . unless you want pink graphics.  Had to refinish the Sweet Cherry Vibe twice!  First time I used a normal clear and the red bled into the graphics.  Stripped everything down and did it again, this time using low-temp clear (325 degrees) . . . still pink -- oh, I was mad by that point.  Stripped everything down again, did the powder and graphics again but no clear this time.  No chips or scratches yet and I've dropped guitar cords on the box more than once . . . so we'll see how it holds up.  So far so good.

After perusing some of the powdercoating forums I found out that that's pretty common with red powder . . . just doesn't want to cooperate with clear too well if you're using any sort of graphics or two-tone.
#26
Build Reports / Vibe-Mania! (Incl. Warhead) >>
September 23, 2012, 12:08:33 AM
I've been on a vibe-a-thon lately . . . just can't get enough of that throb, I suppose.  First up was another Neovibe build, named after the color of powder coat I used.  Enclosure is a Hammond 1550E.  Built from a GGG board -- I put an 18-volt regulator in this one and use a 24VDC wall wart to power it -- running it up to 18 volts gave it some more thump and effect.


Next up I wanted to give the Forum-Vibe a try so I ordered a PCB from Classic Amplification.  This one reminds me of the color scheme of my buddy's '87 Mustang GT.  This was my first attempt at a two-tone powder coat (actually three-tone counting the stripe).  Top is dormant burgundy, bottom is black chrome then I added the tomato red stripe and shot clear over the whole thing.  This one took a full afternoon to powder coat but I'm really pleased with the results . . . you can barely even feel the stripe under the clear.  Enclosure is a Bud Industries CU-234:


Last but not least is my latest, the Madbean Warhead.  Got the board from Haberdasher and decided to go with the military theme . . . that's flat army green powder.  Enclosure is a Hammond 1590J:

[imghttp://i217.photobucket.com/albums/cc18/Fastocker/Vibe%20Pedals/Warhead-001_zps99607b8a.jpg]http://[/img]


All of them sound really good -- right now the Forum-Vibe wins by a hair but with some tuning on the trimmers you can make them all sound virtually identical.

#27
I would recommend sticking with Inkscape or a similar graphics program.  Although I've never actually used Inkscape I did download it, opened it up and took a peak -- it appears to be very similar to the older version of CorelDRAW! that I use.  I just sat down and taught myself how to use DRAW . . . just open a blank document and start.  Use tutorials if available, check the HELP command, etc.  Frustrating at first but you'll get the hang of it.

I always go back to what the owner of the company where I work would say whenever I was whining about not knowing how to do something (or having too much to do) . . . he'd let me go on and on, he'd pause . . . then he'd simply say "Just sit down at the fu#%in' computer and make it happen!".  You know, he was right.

For layout work, I use a similar procedure as described in the original post -- I drill an enclosure and then I lay the actual drilled box directly onto my flatbed scanner and scan it.  I crop the image of the box in Photoshop and then import it into DRAW.  I use the Order command to set the box image at the back so everything I draw will appear on top.  I even scan the actual knobs I'll be using to import and convert them to transparent TIF files; this way I can lay them on the box in DRAW and see through them to properly align them to the pot holes.

Doing this also gives you a good idea of what a pedal is going to look like in it's final form.
#28
Open Discussion / Re: Sand Blasting
April 23, 2012, 05:10:57 PM
Guybrush, outgassing generally refers to pre-baking the item to be coated.  Some castings are fairly porous and heating will promote any small pockets of trapped air or gas to escape . . . meaning less bubbles or flaws in your powdercoated enclosure.  Just pop the item in the oven, heat for 15 minutes or so, let it cool and then apply your powder as you normally would.

I wouldn't go with an engine degreaser . . . too messy.  You want something like a naphtha or other fast evaporating surface cleaner.  Since you linked an eBay.uk item I'll assume you're in the UK . . . maybe try to look for something like paint prep solvent or similar . . . maybe a smaller container of something like this:

http://www.ebay.co.uk/itm/5L-PANEL-WIPE-PRE-PAINT-DEGREASING-SPIRIT-WIPE-ANTI-SILICONE-SURFACE-PREP-FAST-/180865523699?pt=UK_Body_Shop_Supplies_Paint&hash=item2a1c6cdff3

This Eastwood product is what I use and it's perfect for powdercoating -- cleans well, dries quickly and it's not too stinky:

http://www.ebay.co.uk/itm/EASTWOOD-PRE-PAINTING-PREP-US-QUART-946ML-BRAND-NEW-/280709339578?pt=UK_Body_Shop_Supplies_Paint&hash=item415b9499ba

You DEFINITELY don't want to sandblast inside of a dwelling . . . would make a big mess plus you'll need a decent sized compressor as others have mentioned.  Sandblasting works as Jimmybjj mentioned but isn't absolutely necessary for doing pedal enclosures.  But it does leave a nice clean textured surface that promotes adhesion of the powder; it's really a must if you're powdering used car parts, for example.

Come to think of it, I hope you have a 'dirty room' or a booth or something if you plan on powdercoating inside . . . it makes for a dusty mess if you don't contain the airborne powder.
#29
Open Discussion / Re: Neovibe
April 05, 2012, 12:51:42 AM
I just finished a Neovibe -- tough build and a bit of a learning curve to really dial in the lush throb . . . but well worth it once you get it tuned.

Build it just as the diagram shows and you can use either an AC transformer or a DC adaptor.  My advise is to buy a 24VDC adaptor that can put out 200mA and use that for the Neovibe.  I've tried an 18VAC transformer that gave a good deep effect but was somewhat noisy; then I tried an 18VDC adaptor that provided quiet power but the effect lost a bit of the throb/depth.  Finally went with a 24VDC adaptor and that was it -- dead quiet and a lush, deep effect.  BTW . . . there's tons of info on powering the Neovibe over on the DIYSB forum.
#30
Quote from: jimmybjj on March 18, 2012, 03:20:51 AM
Super nice! Square holes gets extra credit :) 
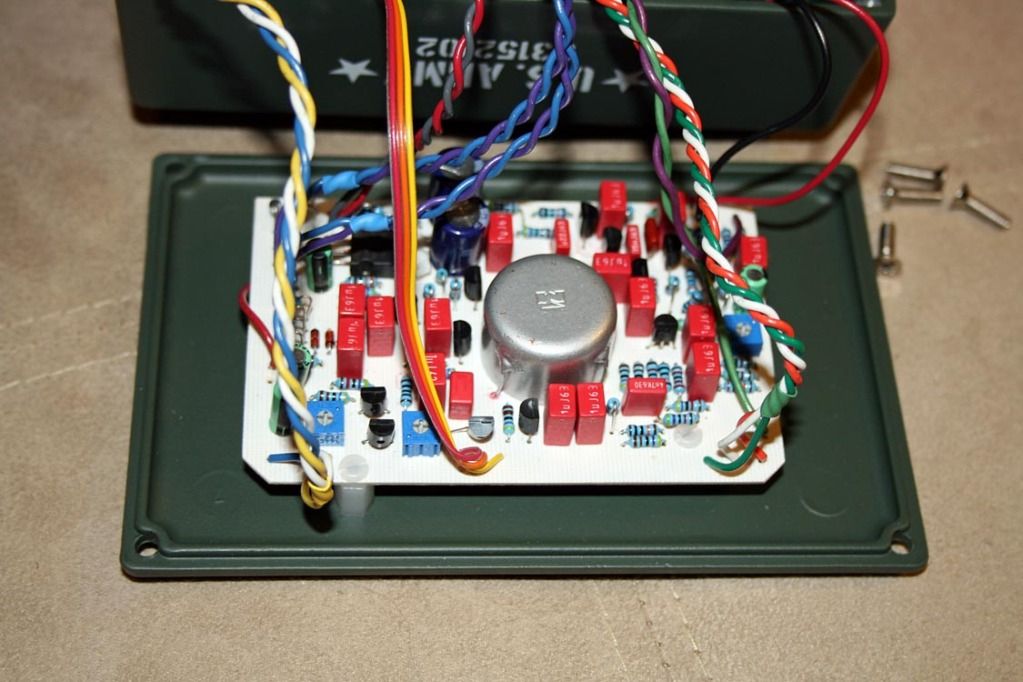
How did you do it? Drill and file?

Thanks, guys.  The square holes are a PITA for sure.  For the switches, the holes had to be 1/2" x 3/4" (or something close, can't remember) so I used a 1/2" drill bit and did sort of a 'Figure 8', then used a couple of small files to shape the corners square.  The small impedance switch was the toughest since I had to use a really tiny file on that one.