News:

Forum may be experiencing issues.

Main Menu
Menu

Show posts

This section allows you to view all posts made by this member. Note that you can only see posts made in areas you currently have access to.

Show posts Menu

Messages - Bieling3

#1
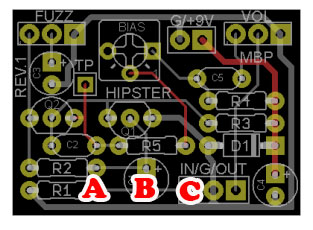
After too much fiddling with the C10 cap trying out different configurations for a mids knob (ya, I should have socketed) I think I've burned out the ring for the hole on the PCB. It's the right leg that connects with R18 and the 3rd lug of the tone pot.

Is it possible to just stretch the leg over to R18 and drill out the offending hole?
#2
Excellent, that's what I did and I was worried I'd made a leap thinking it should go there. It doesn't act so much as advertised, I feel like it's almost acting like the tone knob on my guitar does anyways. Except it goes from a full sound to a thinner mids-ier sound instead of bright to dark. It takes away some of the fart and the pins and needles but I don't know if its worth it. I'll have to try it live and see what's really going on in a band context.
#3
I want to add a 100kB linear pot to my Hipster Fuzzface clone as described at fuzz central's Axis Face page:

http://fuzzcentral.ssguitar.com/axisface.php

QuoteThe "Smooth" Control
The next thing that we're going to do with the circuit is to add a 100K linear taper potentiometer to the input of the circuit, between the new pulldown resistor and the input capacitor, to act as a sort of a pregain. This mod was originally put on the Fuzz Face-style circuits by Mike Fuller and the '69 fuzz pedal. We're only going to use the first lug and the wiper lug of the pot since it only needs to act as a variable resistor. This pot will allow you to reduce the "fizziness" of the fuzz, and will also allow you to greatly smooth out the texture of the fuzz. The pot should be wired like this: Lug 1 attached to the input, Lug 2 (the wiper) attached to the base of Q1, and Lug 3 left unconnected. With this wiring the pot will be at minimum resistance when it's turned fully counter-clockwise, and at maximum resistance when fully clockwise.

The schematics aren't all that different between the two but never the less my inexperience has me asking:

Should I wire the pot between "A" and "B" or "B" and "C"?

#4
That did it! I think I like this even better than the Purple Ram's Head... you guys have been invaluable, thank you!
#5
Thanks for the guidance, I'll check those values!

BTW This is built to Green Russian specs.
#6
I've now disconnected one leg of every resister downstream, R12, R17, R20, and R22 taking them out of the circuit... still no signal beyond one leg of R4.
#7
Q1

C 9.02
B 1.14
E 1.56

Using a wall wart instead of a battery like the readings in the first post...
#8
Okay lifted one leg of R6 (the one that connects to R12 and a whole lot more, and I got signal from it. Something is grounding out down the line. Do I have to lift everything down stream until I get signal at R12?
#9
Signal on the inner side of R4, none on the side that goes to R6... so that means R6 is grounding or something?
#10
Attached transistor with fly leads bypassing the board altogether. Still nothing Does this mean either C3 or one of the components tied to Q1's collecter and emitter could be bad? At this point I'm ready to strip the board.
#11
Yes, I believe I had audio signal at R4, I'll have to reverify when I get home from work tonight. I definitely had signal from the base of Q1 and the left leg of C2... it's the collecter and emitter that seem to be giving me trouble.
#12
I saw that. Doesn't appear to be an issue on my board. All I can think to do is put the transistor on my breadboard and make long jumpers over to the circuit, connecting to R5, R6, C2, and C3... either the board is bad, or more likely there is some kind of bridge I'm not seeing.
#13
Removed the socket, cleaned up and inspected the board. There doesn't appear to be any lifted traces. Soldered the transistor in Q1. Still nothing. Desoldered the transistor, put it in the socket for Q1 in my first Mudbunny build, verified it works there.

Completely lost now. >:(
#14
So with the audio probe I get sound up to one leg of C2 and nothing at R6. I replaced C2 with another 470p cap and no change. R6 is a verified 12k on the multimeter. No sound at C3.

This points me to Q1.

I can hear the signal at the base, but nothing from the collector or emitter. So I swap around transistors from my first Mudbunny build, known good transistors in the proper orientation and still no sound. I triple check and reflow the solder for the transistors socket, still nothing.

I am at a loss so I'm putting it up for the night. Any suggestions... something I'm missing... next steps?
#15
I'll give it a try, also just read up on creating an audio probe, going to make one of those tonight and test all the stages. So do my voltages look alright? I'm think Q4 looks a little low...