
I'm going to build myself an attenuator using a L-pad to tame my Dr Z maz 18. I've learnd that when attenuating a signal you loose highs and the schematics I follow use a 2 pole on-off-on "treble"-switch (2 diffirent caps) before Lug 2 of the L-pad (to filter out bass?). I was thinking i could use a potentiometer to blend one small and one large capacitor instead of the on-off-on switch. Unfortunatly I dont know how to execute this. Could someone tell me how this should be wired? What pot and cap-values that might work?
- Welcome to madbeanpedals::forum.
This section allows you to view all posts made by this member. Note that you can only see posts made in areas you currently have access to.
#1
Tech Help - Etcher's Paradise / Blending 2 capacitor values with a pot?
October 04, 2019, 10:00:17 AM #2
How Do I? Beginner's Paradise. / Help me modify this schematic.
September 18, 2019, 05:47:46 AM
Hi, I want to build myself an attenuator and i will follow this guide https://guitar.com/guides/diy-workshop/diy-workshop-build-your-own-attenuator/
I would like to modify the treble-switch they include in the project
Instead of a switch with two caps I would like to have a potentiometer to increase the treble, how would I do that?
I would like to modify the treble-switch they include in the project
Instead of a switch with two caps I would like to have a potentiometer to increase the treble, how would I do that?
#3
Build Reports / Firebird project
September 18, 2019, 04:50:08 AM
Havn't been active on this forum for a couple of years. Mostly because I havn't really built any pedals but focused on family. However I have built myself a SG-style guitar from kit. After that succesul project I ordered custom part and assembled a Jazzmaster that became my number one guitar. Last three years I've been obsessed with the idea of building a Gibson Firebird clone and this year I finally started the project. From januari through july I more or less spent all hours in my garage after the kids went to bed. Here are some pictures of the process.
<iframe width="480" height="360" src="http://s1282.photobucket.com/user/markusJklein/embed/slideshow/Firebird"></iframe>
there are more photos and videos of the build-process on my instagram: markus.johansson.klein
<iframe width="480" height="360" src="http://s1282.photobucket.com/user/markusJklein/embed/slideshow/Firebird"></iframe>
there are more photos and videos of the build-process on my instagram: markus.johansson.klein
#4
Open Discussion / Attenuator treble bleed?
November 13, 2017, 12:26:06 PM
So I have a dr Z Maz 18 that is waking my childran and pissing of my wife every evening. I was thinking it'a time to build me a L-pad attenuator to quiet things down.
I'm probably going to make on following this guide: http://www.theguitarmagazine.com/diy/diy-workshop-build-your-own-attenuator/
In the schematics they have wired a on/off/on switch with two capasitors to act as a bright/off/brighter switch. I was first thinking I would replace this with a 2-pole rotary switch and wire up 5-6 capasitors but then I was thinking it might be better to wire a capacitor blend pot. What do you guys think? Is it ok/safe to this setup, how would I wire it and what would be good cap valurs?
Thank you /Markus
#5
Tech Help - Projects Page / Polarised caps in position of non polarised cap
February 25, 2015, 12:49:37 PM
Hi, i'm assembling a monster fuzz and i've order som wrong parts. The BOM calls for 0.22uf non polarised caps but i accidently ordered polarised. None of the legs connets to ground so I cant figure out wich way to solder them. Are there any specific rules I could follow here?

#7
Build Reports / 9 months project finished
August 19, 2014, 12:08:17 AMMy better half finished this on this saturday, she fired up right away and we couldn't be happier!
#8
Build Reports / Re: new pedalboard in the making... !!more pictures!!
June 08, 2014, 02:25:04 AM
just got in 5 minutes ago, its soaking in oil at the moment. The wood is really coming to life.


#9
Build Reports / Re: new pedalboard in the making... !!more pictures!!
June 02, 2014, 09:23:12 AM
Thank you everybody!
The AC-input is covered in plastic beacause i'm going to connect a strip of 10 ac-powersupplys to it (cut the wire) and I dont want it exposed. Here's the powerstrip I'm using.
http://www.conrad.se/F%26ouml;rgreningsdosa-utan-brytare-Ehmann-Vario-Linea-10x-1.5-m-Gr%26aring;.htm?websale8=conrad-swe&pi=551550&ci=SHOP_AREA_17267_0809013
Yepp, they are 5V USB jacks. Got the second lamp in the mail this morning so now its finally symetrical!
#10
Build Reports / Re: new pedalboard in the making...
June 01, 2014, 09:44:57 AM
I habe been working on the pedalboard some more now... still a long way to go but here's a picture update.
box for wiring:

mounted:

loads of sanding to get the square hole in plaze... the wood was so much harder to work with than i had imagined.

the inside:

left side of the frame... ouput and FX-loop jacks.

right side

placed the actual board on top, fits snuggly. Velcro all over and to USB-jacks at the top for lamps. Still waiting for the second one.

my babies!

love them all so much

I still need to sand everything before I oil it up.
#11
Build Reports / Re: "remote-controlled" Looper-thingy.
May 28, 2014, 12:29:52 PM
I'll give it another shot:
the octaswitch has 8 footswitches, think of them as banks. For each bank there are 8 dipswitches to set which of the 8 loops should be on or off. Additionally you can set dipswithes for each of the 2 external-control jacks to decide if they should be on or off in each bank.
The pedal in this report uses signals from the external switch jacks instead of footswitches (the toggleswith lets me choose function) to control 2 individual lopps.
hopefully this makes some sense... swedish would have made this much easier
#12
Build Reports / "remote-controlled" Looper-thingy.
May 28, 2014, 08:18:05 AM
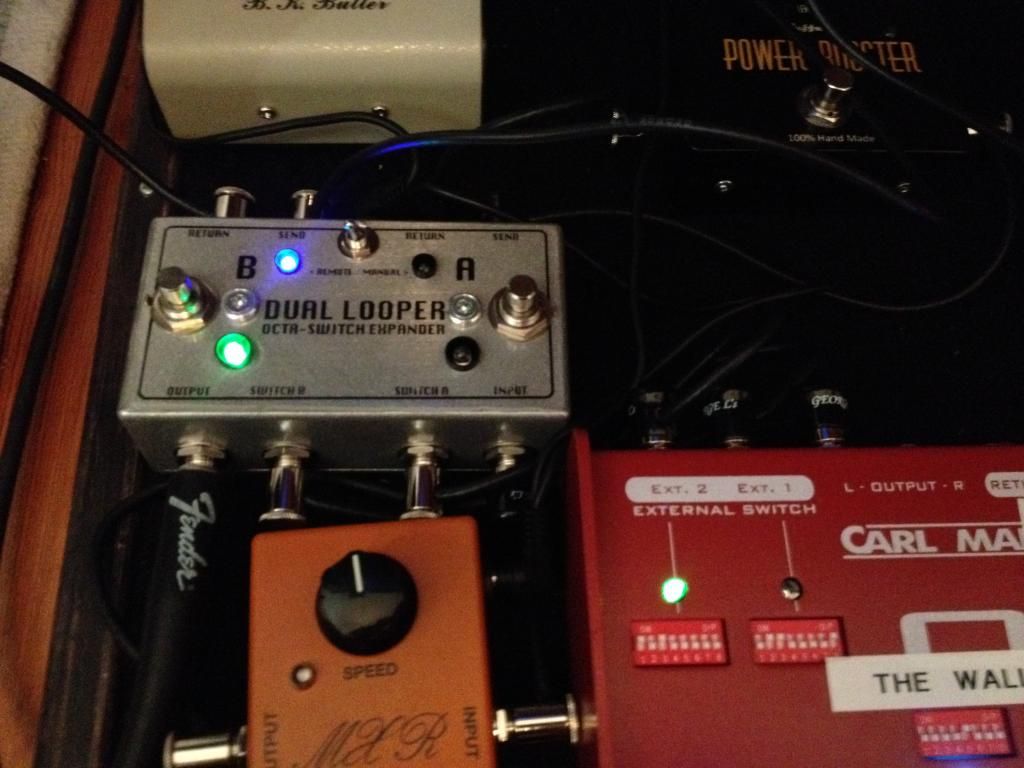
The Pedalboard I'm in the process of making will house about 5-6 more pedals more than I have in on floor at the moment, so I figured I need more control! I want to use the 2 external switch-jacks on my Carl Martin Octaswitch II to control a loop-pedal with 2 FX-loops... this would expand my octaswitch into a 10-loop-pedal. Aside from that, it would also let me place these extra 2 loops before or after the 8 main loops and still let me place pedals in series between the 8 and 2 extra loops.... make sense?
here's the result.


I also added a toggle that switches between "remote" and "manual". Manual lets me use the stompswitches.
Here's a example on how it works. For those of you who are new to the octaswith I'll give you a quick tour. there are 8 switches (9 if you count bypass) each have 8 dipswitches to set which of the 8 loops should be active for that stompswitch. there are also 2 sets of 8 dipswitches for the 2 "external switch"-jacks (to switch amp-channel for example). In the example below I've used this setup:
Guitar > Octaswitch > Phase 90 > "DIY 2 channel looper" > Amp
and in the looper channel B is the Tube Driver, channel A is power boost
Switch B active:
Switch A active:

Both on.

here's the result.


I also added a toggle that switches between "remote" and "manual". Manual lets me use the stompswitches.
Here's a example on how it works. For those of you who are new to the octaswith I'll give you a quick tour. there are 8 switches (9 if you count bypass) each have 8 dipswitches to set which of the 8 loops should be active for that stompswitch. there are also 2 sets of 8 dipswitches for the 2 "external switch"-jacks (to switch amp-channel for example). In the example below I've used this setup:
Guitar > Octaswitch > Phase 90 > "DIY 2 channel looper" > Amp
and in the looper channel B is the Tube Driver, channel A is power boost
Switch B active:

Switch A active:

Both on.

#13
Open Discussion / NEW PEDAL DAY! I'm so happy I could cry!
May 22, 2014, 12:04:54 PM
Finally... I've been waiting since july 30 and now my life is complete!
I'm so happy I could cry.... 


I'm so happy I could cry....


#14
Build Reports / Re: new pedalboard in the making...
May 22, 2014, 06:53:51 AM
Havn't weighed it yet but it's way lighter than I expected. I'll post the final wheight of it when it's done. However the wheight won't ever be a problem cause my rig will always stay at home
#15
Build Reports / Re: new pedalboard in the making...
May 22, 2014, 03:58:33 AM
Thank you everybody!
Won't be able to do any real work this weekend, still waiting for some additional parts to arrive in the mail. While I've been waiting I've played around some more with google sketchup. Drawing up some pedals and trying out diffirent layouts on the future pedalboard. Really fun to play around with and I have found some common pedals, typically BOSS, Ibanez, MXR a such in the 3D-warehouse for sketchup.

Won't be able to do any real work this weekend, still waiting for some additional parts to arrive in the mail. While I've been waiting I've played around some more with google sketchup. Drawing up some pedals and trying out diffirent layouts on the future pedalboard. Really fun to play around with and I have found some common pedals, typically BOSS, Ibanez, MXR a such in the 3D-warehouse for sketchup.
